Showing posts with label recipe. Show all posts

Friday, January 20, 2012

Green Smoothie for Weight Loss?

So, like me, I'm sure that everyone has some sort of health bettering resolution on their New Year's resolution. Weight loss, eating better, whatever. We tend to eat pretty healthy in this family (minus my addiction to Lays Sea Salt & Vinegar chips and Cherry Cokes) but I'm always looking for ways to add more water/fruit/veggies to my diet. 

Have you seen the green smoothie craze on pinterest? I read thru a few of them, and while some people use kale or chard, the general consensus is that spinach is the most tasteless of the "greens". 


So I decided to give it a try. I was a bit hesitant on the whole "let's throw some spinach in a fruit smoothie" thing. So at first, I just put one handful of spinach in my smoothie, and I didn't taste it AT ALL. So I added another handful, and still, nada. 


I've been making these for about a week now, with different fruit combinations. My girls even like drinking these. 


The basic recipe I use is...


2 bananas (it's a great way to use those bananas that are getting too soft to eat)


2 handfuls of spinach


handful of strawberries (I end up using 6-8 medium sized ones)


ice cubes, about 6-8


a cup of milk


If I'm not sharing it with the girls, I'll throw in a half a scoop of my protein powder, which gives it a slight chocolate taste. The protein powder I use is Champion Nutrition Pure Whey Protein powder in chocolate. It's 130 calories per scoop with 26 grams of protein.

I'll also add a spoonful of Metamucil fiber powder to mine. 

Spinach has fiber, vitamins A, C, E and K. Other health benefits of spinach can be found here. For me, I can always use more veggies in my diet, so anything that doesn't take a huge amount of additional effort in my book is a win. 


Some people use orange juice as their liquid, others use water. I never drink milk, so anytime I can add milk to a recipe and not taste it, I'll do it. Other people use almond milk (which is still on my "to try" list) or soy milk. 


You can basically add any fresh fruit that you have on hand (I will say that I tried it with raspberries, and didn't care for it, the raspberries were too over powering).

Now, mine did not turn out as pretty of a green color as the ones pictured on Pinterest. Mine is more of a blah, boring green. (I could have photoshopped it up, but that's not my style). But it's yummy, and easy to make.  I've been doing one for breakfast. I always end up making enough for two big glasses of it. So I'll do one for breakfast, and put it in the fridge until it's time to have it for my morning snack. 


Have you jumped on the green smoothie craze? Are you going to try it? 


Photobucket

Friday, December 9, 2011

Teacher's gifts? Dipped pretzels, baby.

So, this year, I dig my kid's teachers. My middle daughter is in kindergarten, and her teacher was also her pre-K teacher. Super nice lady, I know Jasmin loves her. And Arielle's teacher? Anyone who can deal with my oldest daughter for 8 hours a day and not strangle her is an angel in my book. 

This year, I'm making dipped pretzels for their Christmas gifts. My bloggy buddy Julie at It's Sew Stinkin' Cute showed me how to make these. She said that at a bakery near her house, they sell these things for $1 a rod. Holy crap! I can make like, 30 of these for under $10.

Now, this is the lamest tutorial ever. Like, as in, no pics. I made some of these bad boys yesterday, and I had every intention to take pics. But it's impossible to take a pic and make these at the same time. So we're going to use our imaginations, mmmkay? 
 

Things you need


Pretzel rods, duh. But I didn't get the Snyder's ones. I'm totally cheap and went with the Walmart brand in the white bag. Tastes just as yummy, and they were around $2 a bag. 

TIP: take your time and go through the bags, find ones that don't have a ton of broken rods. Although hubby likes when the bag has broken rods, cause the gets those ones. 


Get ya some of these. I've seen these at Walmart in the cake decorating/party section, and I've seen them at Hobby Lobby too. The ones I'll picture at the end were made with red and white. The ones I'm making for teachers gifts are white with red and green drizzles. Ya know, for Christmas.

I know some people use almond bark for the white part. I looked up online about using white chocolate, but apparently it's tricky to use, like it doesn't melt or gets all goopy, so I didn't want to deal with that.


You will also need a bowl to melt the wafers in (I like using my big measuring cup), a spoon, some wax paper and a cookie sheet. 

The process

First step is take some of the wafers, place them in your bowl, and place it in the microwave. Nuke it for no longer than 30 seconds, stir it, nuke it for a few seconds more, stir it, and so on and so on until it's all melted and easy to stir. I like to add a splash of vegetable oil (NO water, it'll ruin the consistency) in the bowl to help it be more smooth. Don't just nuke it without checking and stirring it, it is possible to over cook these. 


Once those are all melted, place the pretzel rod in the bowl, take your spoon, and spoon the melted candy over your pretzel rods until they are mostly covered (leave a couple of inches on one end uncovered so you can hold it). When it's all covered, I like to shake it up and down to get some of the excess off (do this over the bowl, duh). Then place it on the wax paper, which you have laid on your cookie sheet. If you are going to do sprinkles, do it at this time before the candy has dried.

Keep repeating this until all of your pretzels are covered. To speed up the cooling process, place the cookie sheet in the fridge for 10-15 minutes. 


To do the drizzled colors, you just repeat the above process. But instead of spooning the mixture over the pretzels, I placed it in a ziplock bag, snipped the tip off of one of the corners, and squeezed it out over the pretzels. Bloggy buddy Julie uses a squeeze bottle for this part.

I did let the red candy harden before I did the green on the teacher's gifts, so the colors wouldn't mix.

And voila! It's all done. We made these for Ava's birthday party, and they flew off the plate. Let me know how they turn out if you make them!


Photobucket

Wednesday, October 12, 2011

Chili Roasted Salmon with cilantro cream sauce

I posted a pic on facebook of some salmon that I made the other night, and had quite a few people message me, asking for the recipe. So rather than send the recipe out, over and over, I thought I would just do a blog post about it. You'll have to forgive my picture, it's just a camera phone pic. But if it looks this good in a crappy phone pic, imagine how good it looks in person. 


Chili roasted salmon with cilantro cream

Ingredients
Nonstick cooking spray
4 tablespoons fresh lime juice
4 garlic cloves, smashed
2 teaspoons chili powder
2 teaspoons ground cumin
3 teaspoons olive oil
4 5-ounce skinless salmon fillets
1 1/2 cups frozen corn kernels, thawed
1 red bell pepper, thinly sliced
1 poblano pepper, thinly sliced
1/2 small red onion, thinly sliced
Salt
Freshly ground black pepper
1/3 cup light sour cream
2 tablespoons chopped fresh cilantro


Directions
1. Preheat the oven to 425 degrees. Mist 2 large baking sheets with cooking spray. In a small baking dish, mix together 2 tablespoons lime juice with garlic, chili powder, cumin, and 1 teaspoon olive oil. Add salmon and turn to coat; let sit.
2. In a medium bowl, toss corn, bell pepper, poblano pepper, and onion with remaining 2 teaspoons olive oil. Transfer corn mixture to one of the baking sheets; spread into a single layer.
3. Remove salmon from marinade and arrange on second baking sheet. Drizzle corn mixture with remaining salmon marinade. Season salmon and corn with salt and black pepper to taste and roast 8 to 10 minutes, until fish is just cooked through and vegetables are tender.
4. Mix together sour cream, cilantro, and remaining lime juice. Season with salt to taste. Spoon corn onto plates and add salmon. Drizzle cream over fish.

Nutrition facts per serving: 444 calories, 33g protein, 22g carbohydrate, 25g fat (5.9g saturated), 3g fiber


*I did make a small change. Where it says to "Drizzle corn mixture with remaining salmon marinade",  I did do that. However, I also made up another batch of the salmon marinade and tossed the veggies with it. We really like the marinade, and just using the leftovers wasn't quite enough for us.

Photobucket

Friday, October 7, 2011

Super Freakin' Easy Parmesean Knots

I'm always looking for simple recipes that make me look like I slaved in the kitchen all day. These totally fall in that category. I found this recipe on Real Mom Kitchen, and yes, mine looked like theirs when I was finished. I call that a success.


    •    1 tube (12 ounces) refrigerated buttermilk biscuits (I used the knock off brand)
    •    1/4 cup canola oil
    •    3 tablespoons grated Parmesan cheese (I used the generic can stuff)
    •    1/2 teaspoon garlic powder
    •    1 teaspoon dried oregano
    •    1 teaspoon dried parsley flakes

    1.    Roll each biscuit into a 12-in. rope and tie into a knot; tuck ends under. Place 2 in. apart on a greased baking sheet. Bake at 400° for 8-10 minutes or until golden brown. (I found it easiest to take each end and slowly pull it apart until it had stretched out quite a bit, then rolled it in between my hands.)

    2.    In a large bowl, combine the remaining ingredients; brush the warm knots with the mixture.

And voila! You look like super mom/wife, and you can take pride in knowing that your family has happy tummies, without a ton of effort on your part. These are yummy, even my picky eater asked for seconds.

Photobucket

Wednesday, May 4, 2011

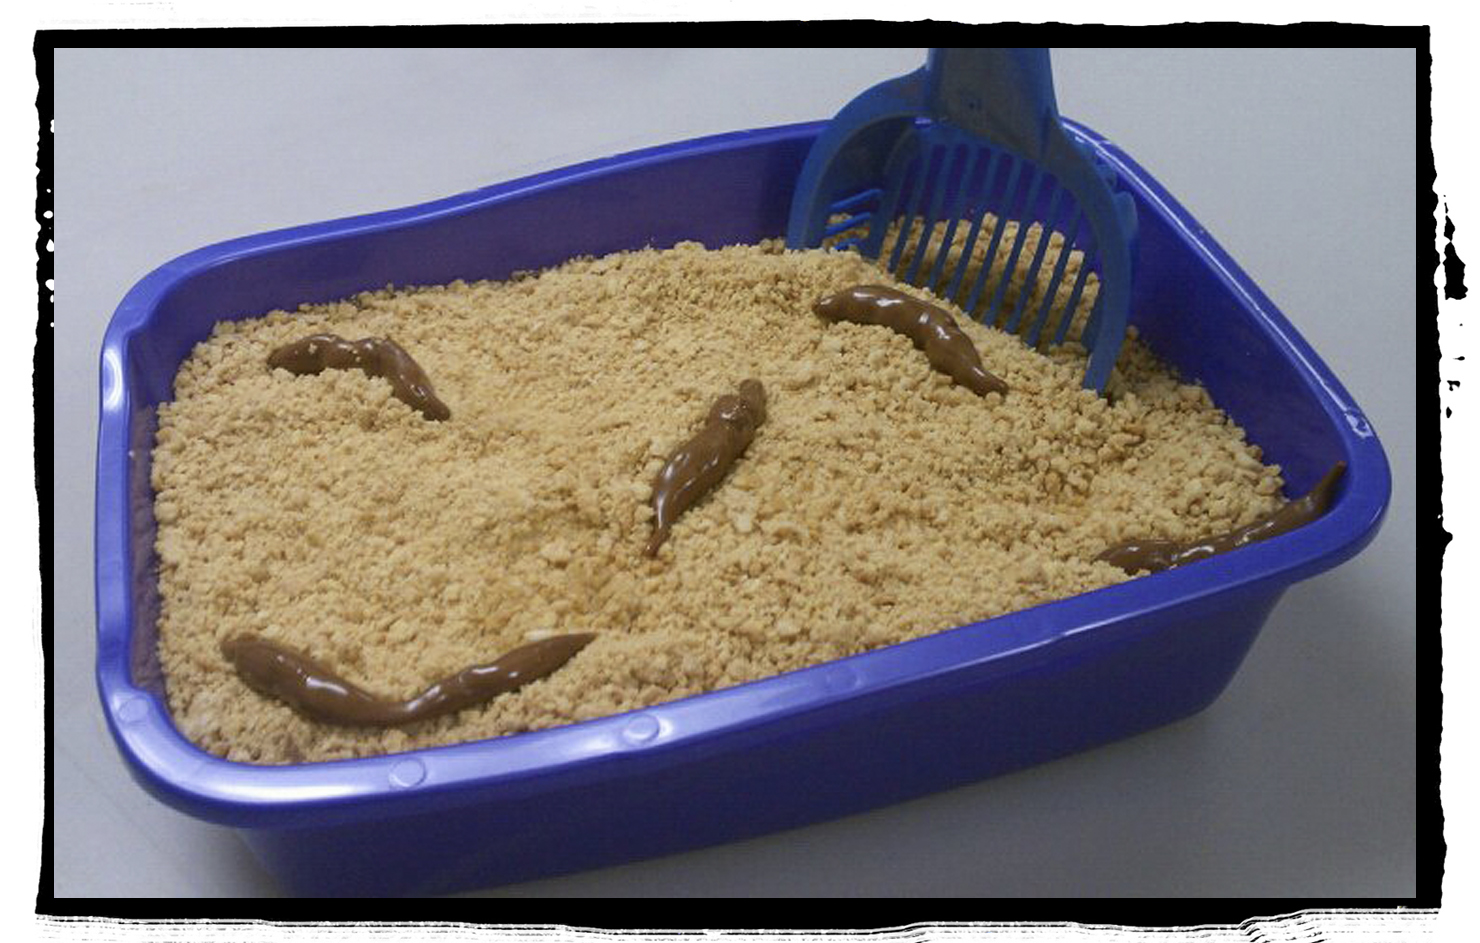
Kitty Litter + poo = yumminess

No, I haven't gone off of my rocker. Have you heard of a Kitty Litter Cake? It's yummy, but you might have to eat it with your eyes closed.

At hubby's work, the person who had the last birthday is responsible for the next birthday person's cake. They used to always make fun cakes, but then people got busy/lazy/whatever, and started just picking up a cake at the grocery store. But what's the fun in that? The birthday lady, Janet, has always been wonderful to my girls, so I really wanted to do something special for her.

I originally found the recipe here, but after reading thru all of the reviews, decided to alter it a bit.

Ingredients

1 box german chocolate cake mix
1 box white cake mix
1 4 count package of vanilla pudding cups
1 bag of vanilla sandwich coookies
10 or so tootsie rolls
new kitty litter box (the small one was about $3 at Walmart)
new litter scoop


Bake both cakes according to the recipe on the box. let cool. Try not to eat too much of it (I heart warm cake fresh out of the oven)


After the cakes cooled, I put the chocolate cake on the bottom. Trim if you need to to fit. I forgot to take a pic of that. So pretend this pic is of chocolate cake, about half as tall. 

Then put the white cake on top of that. Mine is cut up in pieces, since my cake pan was being stupid and wouldn't release it in one nice piece.


I then took the pudding cups (I used all 4) and spread a thin layer on top of the white cake.


I used the cheapo Walmart brand of the vanilla sandwich cookies. Apparently they are really good though, since hubby said I'm not allowed to buy them anymore and I had to keep him from stealing the cookies from me. I put about 2/3 of them in a large ziplock bag, and then used a rolling pin to crush them. The original recipe says to use a food processor, but I'm cheap and never bought one.


I then spread a layer of the crushed cookies on top of the pudding layer. Apparently I sucked at the taking pics part of this tutorial.


I used tootsie roll minis, since the long tootsie rolls are too thin. I just unwrapped two of them, and worked the two ends together. Then put it in the microwave on a plate, heated them up on high for 10 seconds. Then when they're soft and pliable, have your hubby form them into "poop" (twist the ends so they are no longer blunt, curve them, etc). Then place them on the cookie layer.


Try not to gag when hubby is finished with the poop part. He had too much fun with these.


And voila! Poopy cake.


Oh, and apparently it was very good. Hubby texted me this pic after the party. Scraped clean, yo.


What I learned:

  • You can use any kind of cake you want, since the vanilla sandwich layer covers everything. Some reviews said they used marble cake, spice cake, etc. 
  • Other people used peanut butter cookies (i.e. Nutter Butter) instead of the vanilla. But I was happy with the color of the vanilla cookies. 
  • The original recipe calls for you to save part of the vanilla cookies and mix them with green food coloring and sprinkle that on top. But I don't remember having green bits in my litter when we owned cats, so I nixed that part. 
  • The original recipe calls for you to crumble both cakes, then mix the vanilla pudding mix until it's moist but not soggy. But that just sounds weird to me, and some reviews said it wasn't very tasty and was hard to scoop out, so I just did layers of cake. 


Oh, and you want to know how you know if your cake was a success?  When the party started at 2, and your facebook page looks like this at 2:30.


    Photobucket

    We all love a good party:

    Photobucket  Stinkin Cute Thursday Button  
       

    Wednesday, March 2, 2011

    Chili Roasted Salmon with Cilantro Cream Yumminess

    So, I'm going to be getting tortured at the dentist tomorrow. Remember that post about my sucky teeth? Well, I'll be making my dentist richer tomorrow.

    While my latest craft project is still drying, I'm going to share something I made a couple of nights ago. Talk about yummy! And it looked super fancy, and was super easy. Remember when I talked about Operation: Better Wife? Part of that is trying out new recipes. Hubby's absolute favorite thing is when I try new recipes, instead of my normal 2 week rotation of meals.

    I found this recipe in a magazine called Taste of Home. My grandmother got me a subscription to it for Christmas one year. At first, I wasn't sure about a recipe magazine (I'm not the biggest fan of cooking) but now I (and hubby) LOVE it, so she renews my subscription every year. 

    Chili Roasted Salmon with Cilantro Cream


    Ingredients

        •    4 tbsp Fresh Lime Juice
        •    4 Garlic Cloves
        •    2 tsp Chili Powder
        •    2 tsp Ground Cumin
        •    3 tsp Olive Oil
        •    4 5oz skinless Salmon Fillets
        •    1 1/2 cups Frozen Whole Kernel Corn (thawed)
        •    1 medium Red Bell Pepper, thinly sliced
        •    1 Poblano Pepper, thinly sliced
        •    1/2 medium Red Onion (whole) thinly sliced
        •    1/3 cup Light Sour Cream
        •    2 tbsp Cilantro  

    Directions
    1. Preheat Oven to 425. Mist 2 large baking sheets with cooking spray. In a small baking dish, mix together 2 Tbsp lime juice with garlic, chili powder, cumin, and 1 tsp Olive oil. Add salmon, turn to coat, let sit.


    2. In a medium bowl, toss corn, peppers and onion with 2 tsp of olive oil. Transfer to one of the baking sheets and spread in a single layer.


    3. Remove salmon from marinade and arrange on second baking sheet. Drizzle corn mixture with remaining salmon marinade. Season salmon and corn with salt and black pepper to taste and roast 8-10 minutes until fish is just cooked through and vegetables are tender.


    4. Mix together sour creme, cilantro and remaining lime juice. Season with salt to taste. Spoon corn onto plates and add salmon. Drizzle creme over fish.

    *Edit*
    -I didn't have a red onion (so much for reading the ingredient list before I went shopping) so I used a white onion and it was fine.
    -I also used a can of corn, instead of frozen corn.
    -I also had to cook my salmon almost twice as long.
    -I also put the veggies on low broil for the last couple of minutes.
    -Oh, and I didn't use fresh lime juice. I just used that green bottle of lime juice you can get for a buck.

    So you're looking at a super easy meal. My magazine says it's 444 calories per serving.

    Hubby LOVED it. So go me!


    Photobucket

    Linking up to my FIRST food parties!