Tuesday, January 18, 2011

My easy version of subway art

One of my favorite couples just had an adorable baby girl, we'll call her Miss E. I had signed up to bring them dinner, but wanted to make a little something to bring with me when I dropped off dinner. Everyone loves presents, right? So I thought I'd try my hand at subway art, and this is what I came up with.

I've been seeing all these awesome versions of subway art on different blogs, google, etsy, etc. Jen at Tatertots & Jello did some really cute ones for Valentine's day.


But most of the ones I've been seeing involved vinyl cut from a Cricut or a Silhouette machine.  Well, I don't have either of those, so here is my solution.

I stopped by Walmart, and picked up a wood board in the craft section for $4. I sanded off the rough spots, and spray painted it pink, since I knew Miss E's room was mainly pink. I wasn't worried about the center of the board having good coverage, since I knew it'd be covered up anyway.


So while that was drying, I hopped onto photoshop, and with the dimensions of the board, I took the birth information (name, weight, length, date, time), and added some cute sayings that I knew they'd love. Then it was just a matter of playing with fonts and sizes (combined with a few questions to my graphic designer hubby for a second opinion).


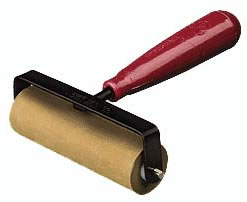
So I had hubby print it out, and I used my trusty mod podge to attach it to the front of the board. I'm not cool enough to have a brayer yet, so I just put a sheet of wax paper on the front, and used a rolling pin to work out all the bubbles. Worked pretty well, although I'll probably pick up a brayer with this weeks 40% off coupon at Hobby Lobby, just so hubby stops giving me dirty looks when I use kitchen tools for my crafts.

That was originally my plan, the painted board and the paper. But after looking at it, I thought it looked too plain. Then I remembered these scrapbooking decals that my friend Heather sent me. I double checked the pic that Miss E's momma sent me of the bedding, and saw that there were touches of green in it. So I picked out the green scrolls, and played around with those.


And had hubby give his second opinion again for decal placement.


And then, decoupaged those down, and put a few coats on top of everything. I then used a green ribbon and attached it to the back so it could be hung on the wall.


This was a super easy project that cost me under $5 and just a little bit of time. And you won't have to worry that someone else already bought them the same thing.

Miss E's parents loved it, which is always the best part of any gift. Welcome to the world, Miss E! You lucked out with some pretty awesome parents.

Photobucket

Linking up to

Anything RelatedThe DIY Show Off

Sunday, January 16, 2011

Easy but Fabulous Paint Chip Wall Art


This project was featured on Knock Off Decor! Can I get a what what!


I had a wall in my kitchen that was just begging for some art. I first saw this idea on Mod Podge Rocks and fell in love with it. I saw a cute version on The Boatwright Family Blog too. This was originally inspired by this piece on the Ballard Designs Website. But who wants to pay almost $300 for something you can make for under $10?


My first stop was at Home Depot for some paint chips. I grabbed a stack of different colors (sorry, Home Depot) and brought them home. I then laid them out and removed some of the colors that didn't work.


I then measured the smaller side, and it measured 3.25 inches, so I got out my cutting mat and my exacto blade and cut the longer side down so it'd be a square. Then it was time to do some math. I knew that I wanted the final piece to be a square, so after doing some multiplication, figured out that my final piece would be 32.5 by 32.5 inches, so 10 squares by 10 squares. So I had hubby stop by Home Depot on the way home from work, and pick up a piece of 4x8 plywood for $8, and they cut it down to size, for free. I heart free. I also had him pick up some blue paint chips, since my neutral color pallet was looking a bit blah. I then painted all the edges of the board a dark brown.

So my next step was to lay out all of my squares, and figure out my pattern. Then I stacked them in order.

So after I stacked them, I laid out a handful of them on a tray covered with tin foil, brought them outside, sprayed them with 3M spray adhesive, brought them back inside, and laid them down and used a card to smooth them down. Then did that about 4 billion times until I was finished with the whole board.


Then, after those were done, I put mod podge on the board and brushed it out. I did three layers of mod podge. I like texture, so I made sure there were a lot of brush strokes in my layers.


I let those dry for a day, and then got out some wood stain. I used Minwax "Dark Walnut". I would put on a layer, take most of it off, let it dry, and then repeat. I did three layers of the stain.

Hubsters says I always look mad in pictures. I think I look like I'm concentrating.
If after you put on all the layers of stain, but there are just a couple of paint chips that are still too bright, you can just put the stain on those ones, let it sit, and then gently wipe it off.


Excuse the camera flash, it was the only way I could get the mod podge texture to show up. The stain would settle in the crevices, but I like that.
One of the things that hubby and I loved so much about the Ballard Designs piece was the gold sheen to it. So on the final coat of the mod podge that I put on top of everything, I added some shimmery gold craft paint in a ratio of one part gold paint to 4 parts mod podge, give or take.

So after you have your super amazing hubby hang it...


You are left with this!

You can see the gold sheen in this pic.
Hubby told me to "Vanna White" it.


*I stacked my paint chips in order from 1 to 100.  But somewhere between stacking them, spraying them with glue, and laying them out, they got out of order. Luckily I was going for a random pattern, so it didn't matter anyway. But if you're going for a specific pattern, it'd be worth numbering them all. Don't press too hard, or you'll see the indentations on the front.
*Use a darker stain than you think you'll need. Since you're wiping most of it off, a lighter color isn't going to show at all. Always remember that it's easier to add than it is to remove.

Are you going to make one? I had the mod podge, stain, gold paint, and 3M glue already. So with the free paint chips (Thank you Home Depot), I paid $8 for the board. And I have a ton of wood left over, hubby wants me to make an all blue and gray one for the master bathroom. So this project cost me under $10.

If you make your own paint chip art, please link back and let me know so I can check it out. Happy Crafting!

Photobucket

Linking up to these parties...


mmm button