
Have you entered my giveaway? It ends on Sunday. I know you want to, I can tell.
********************************************
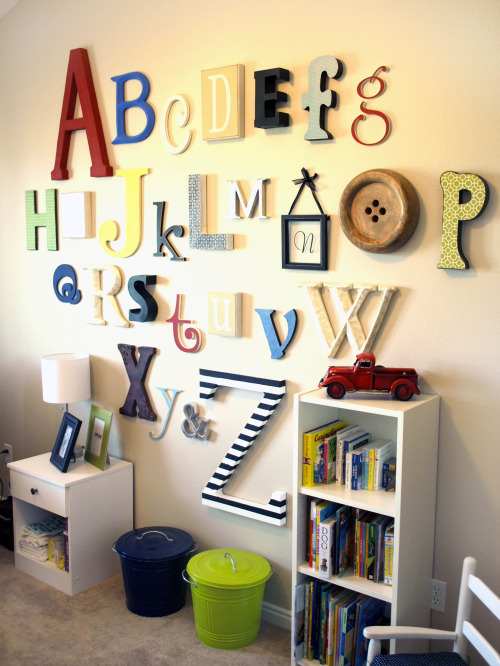
So, I'm all about collections in my house. More specifically, letter collections. On our mantle, we have a collection of the letter "D" for our last name. In my oldest daughters room, she has a wall of "A"'s for Arielle. I always keep an eye out when I'm at the thrift store for either of those two letters. I made a wire wrapped letter for our living room a long time ago, and decided to do a version for Arielle's room.

So this is what I started with. Some $3 wire from Walmart (they had two versions, one longer and thinner, one thicker and shorter. I picked the second one, I think it's still 12 yards long). I also had hubby print out a 7 inch letter in a typewriter font. It was a little bigger than I planned. When I said 7 inches, apparently I was thinking of a 5 inch tall letter. Oh well, I made it work.

So, I put some double sided tape on the edges of the letter, and used the wire to line the outside of the letter.

Once I had one layer going around, I wrapped some wire around that, and went around the sides again. If the letter doesn't lie flat, no worries. It'll be easier to flatten out, once you have more layer on it. It helps to have some pliers to help you wrap the end of the wire.

For me, I'm not about perfection. My letter wasn't exactly lined up with my paper, but I wasn't worried about it. This project probably isn't for you if you're OCD.

After I got the sides double wrapped, I started going from side to side. Sometimes I would just wrap it around the outsides of both sides (wrapping across both wires), other times I'd stabilize it by wrapping it around the individual side.

And here is my completed piece! I think it'd be great for those of you who do those fabulous alphabet walls.

And here it is on her wall! She loves it. I love it. Score.

And here is the original one on my fireplace mantel.
So, whatcha think? Love it? Hate it? If you hate it, lie to me. My ego is fragile.

This is where I'm linking to...


Love it! It's really cute and I'm telling the truth :)
ReplyDeleteCOOL! I really like this!
ReplyDeleteI love it...totally unique and it fits nicely with the rest of her collection :)
ReplyDelete"a" is for awesome. Love it!
ReplyDeleteOh, I really like it! It's such a nice unique take on the letter thing.
ReplyDeleteAwesome! Very nice for your little ones collection
ReplyDeleteThis is fantastic idea!! I'm definitely going to need to try this. I even pinned it to my "Things To Try" board on pinterest. :-)
ReplyDeleteSo you know I'm going to try this and am totally pinning it! Sweet idea!
ReplyDeleteLove it! Pretty sure I'll be doing one as well!
ReplyDeleteI love it! looks awesome!!!
ReplyDeleteThis is awesome! I will have to give it a try.
ReplyDeleteOooooh love this!! What a great idea! As if I need more excuses to make monograms for my house LOL. Thanks for linking up :)
ReplyDeleteLOVE. LOVE. LOVE. *sigh Wish I had thought of that! I'm so gonna try this...and it's getting pinned for sure ;)
ReplyDeleteWhat a great idea! I think it's really cute!!
ReplyDeleteLove this! You are so talented and crafty! Love your blog too!
ReplyDeleteI'm your newest fan/follower on GFC!
Have a great weekend!
nancy
Style 'n Decor Deals
http://stylendecordeals.blogspot.com/
Ummm...this is AWESOME! What a fantastic idea! Love it...and I'm a new follower...;)
ReplyDeleteNope! I can't say something I don't think,...so I can't say it's silly. I can't say it's ugly, and I can't say it's out of style because IT IS AWESOME!!! Thanks for sharing such clear instructions!
ReplyDeleteThat is totally cool!
ReplyDeletehiya x love love love this idea x tfs
ReplyDeletexmaggiex
I really like this! I appreciate the few materials required and that it didn't have to be perfect! I have an "a" daughter in my house; I may try my own version... Saw you at FT Think Party.
ReplyDeleteThis is very cool, I love that it's not solid wrapped with wire, but that you can still see through it. Great tutorial! Jen @ www.icantstopcrafting.blogspot.com
ReplyDeleteLove your letter. Our letter is an L and I never ever see it anywhere!! Might have to try this. Thanks for sharing this!
ReplyDeleteGreat idea, I might try it for my sons room! New follower from fancy friday hop, have a great week!
ReplyDeletehttp://wvfrugal-wvsaver.blogspot.com/
So cool! I love it!!
ReplyDeletethis is SO cute! I seriously adore it! I found your blog through a link party and LOVE it! I am your newest follower and would love it if you would check out my blog and follow me too! Thanks!
ReplyDelete-Nikki
http://chef-n-training.blogspot.com/
Love it! I think it's great. I'm feeling inspired...Thanks!
ReplyDeleteRachel
http://www.holy-craft.blogspot.com
I have a letter wall and I feel I might have to make an addition. So cute. I am a new follower. Check me out at www.sciencesoftballandsomethingsweet.blogspot.com
ReplyDeleteVery cool! Can't wait to try it!
ReplyDeleteOh my gosh! I love it! Did it hurt your fingers wrapping it around? Did you have much wire left over? I have to know! I want to do this now!!!
ReplyDeleteI love it! I also love the collection of A's in the room, what a great idea! :) Linked over from sugar bee today.
ReplyDeleteVery cute!
ReplyDeleteAdding this to my 'to make' list! :)
this rocks!
ReplyDeleteI love it! So much that I'm following you now.
ReplyDeleteCome by and say hi on my blog at www.illgetyoumypretties.blogspot.com
Why not add beads? It would be adorable for a little girl's room. Try colored wire (telephone wire) for a child's room as well. The ideas are endless. Thanks for posting.
ReplyDeleteI love it! The street vendors here in South Africa do stuff like this- lots of beading and wore wrapped flowers, key chains, and baskets. Good job!
ReplyDeleteYour idea just gave me another idea! Im going to do a wire "ball"... Hmmm Im OCD'ish so lets see how it turns out lol.
ReplyDeleteBTW I found you thru "Hookin Up with HoH #54" :)
ReplyDeleteRather than buy the wire, you could dumpster dive for some left over copper wire and do the same.
ReplyDeleteI just saw this. I LOVE it! I saw it pinned, and just realized it was yours! I want to make one for a gift, but it would need to be an 's'... not sure I have the patience to do an 's'.
ReplyDeleteLovin' your D collection! I'm building an F collection of my own!
Love this! I'm pinning it as a future project. Thanks for sharing. BTW: Visiting from Not Just a Housewife
ReplyDeletenewbie here - visiting from N.J.A.Housewife!
ReplyDeletelove this. really fantastic tutorial.
thanks for sharing.
cheryl xox.
you nailed it again! you're pretty darn good!!!!
ReplyDeleteIt is awesome - and how cool is it that my daughter's name begins with an "A" - so I can follow your steps exactly! Thanks for sharing!
ReplyDeleteLOVE this! So fun and simple! Thanks for sharing!
ReplyDeleteWe host a linky party "Strut Your Stuff Sunday!" We would love for you to link up! We appreciate it!!
Kristine
www.jandmseyecandy.blogspot.com
This is great! It reminds me of an award-winning wire sculpture one of my sisters did in high school (of a hand). I'm going to send this to her--she just had a baby and LOVE monograms for her new daughter!
ReplyDeleteHere from Sisters of the Wild West
love this idea was wondering how you did it was happy to see you shared your tip of how to come see what I shared at http://shopannies.blogspot.com
ReplyDeleteI have a thing for letters too! I am going to steal some of your creativity on this one! I love it, and not to much $$ makes me :)
ReplyDeleteThanks for linking up and sharing with us today! We appreciate it!
Britney
www.jandmseyecandy.blogspot.com
This is such a great tutorial! I am going to have to keep this in my "some day" projects :-)
ReplyDeleteI stopped over from J&Ms Strut Your Stuff link party where I've linked up too, pop on over if you get a chance.
Hugs, Antonella :-)
Awesome idea! I totally plan to give this a shot! Thanks for sharing with us!
ReplyDeleteHi Jennifer,
ReplyDeleteI just came across these repurposed cork letters on Etsy and remembered reading your post a while back. Thought you might like them!
http://www.etsy.com/shop/CreativeCorksNMore?section_id=7961551&page=1
-Jen
Wow, too cool! I think this is just fantastic and linked it to my letters and numbers post today, well done!
ReplyDeleteWay to go! Love that you shared how you did it, so fab!
ReplyDeleteKim
Dixon is my last name too! Yay! Thank you for the inspiration!
ReplyDeleteWow, I am amazed by your creativity!! I am definitely going to try this sometime...so cool! Thanks for the idea!
ReplyDelete-M
agirlsguiltypleasures.blogspot.com